Geodesic Dome Tent Construction Instructions
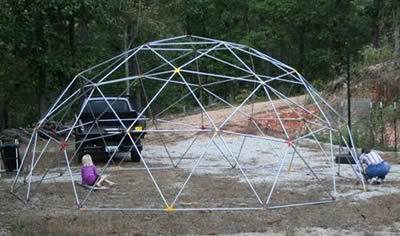
These instructions are for an order-three icosahedral base geodesic dome.The dome is approx. 24 feet in diameter (142 inch radius).
It requires 120 struts which can be cut from 60 10ft pipes. Three different length pieces are used (A, B and C). Use 1/2 inch EMT (electrical metal tubing) pipe that comes in 10 foot segments. This is a galvanized steel conduit pipe that costs approx $1.50 per 10 ft length. You can buy these from Home Despot or other warehouse style hardware stores. They come in bundles of 10. Get 60 pipes plus a few extra. You will also need 46 bolts, 46 nuts and 92 washers. The bolt width is not critical. 1/4 inch diameter steel bolts will certainly be strong enough.
| name | length | quantity |
| A | 59 5/8 inch | 50 |
| B | 58 3/8 inch | 40 |
| C | 50 9/16 inch | 30 |
Each segment of pipe is cut into two pieces (of possibly unequal length), thus:
There should be a little tube left over at the end of each pipe. The final length of each piece should be as accurate as possible (preferably to within 1/16"). Accurate pipe construction will make the dome assembly easier.
Once the pipes are cut, the ends of each pipe need to be flattened by hammering or compression. The ideal tool for this task is a shop press, but unfortunately these are not so easy to come by. Hammering with a heavy sledge hammer can be a good option if you have plenty of agression to get out and a space where you can make lots of noise. Otherwise you can improvise a press using a very heavy vise and a piece of heavy pipe as a handle. Don't try to use the EMT pipe as a vise handle, because it is not strong enough and will bend.
Flatten between an inch and 1.5 inches of pipe at each end. The pipe may crack along it's seams at the place where you flatten it. Not to worry though, this won't significantly affect the construction. Try to make the flattened parts of the two ends of each pipe as parallel as possible. This is quite important, and trickier than it sounds. Also try to get them pretty flat (since we need to bolt up to 6 pipes togther at each vertex).
Then drill holes in each of the flattened ends of the pipe. The holes should be a little wider than your bolt diameter, to make assembly easier. Put the center of the hole half an inch from the end of the strut. If you have access to a drill press you will find this job much easier. Use a very hard drill bit, such as a titanium steel bit, and apply a little oil to the surface before drilling.
At this stage you should file the ends of each strut to remove any sharp corners and burrs created by the cutting and drilling. This reduces the risk of the dome covering cloth catching and tearing on the strut ends.
Next bend the flattened end of each pipe over by about 12°. The exact angle
is not critical.
view from the side; sections marked with thicker lines
Each section of the dome uses the same struts in the same places. Of course we don't have to build it in sections. We can build it top-down. It just helps with visualizing what goes where.
view from above
Dome Cover
You may also need a cover for your dome. This can be made out of a number of segments of cloth.
 |
|
This example shows how to make the cover using eight segments. Each segment is 120 inches wide at the base and is made from two pieces cut from a 24 foot long, 60 inch wide cloth. The measurements given include an allowance for one inch seams. If you are using substantially narrower cloth you will need a larger number of segments. Divide the circumference of the dome (900 inches) by the width of your material (minus two inches, to allow for seams), to get the number of pieces you'll need. In this case the length and shape of the segments will be the same, but they will be narrower at the base. Sew the segments together to make the full covering.
Dome cover, view from above
Building the dome
Instructions:
1) Lay out dome mandala on ground
2) Start at the middle and work outwards, attaching struts with bolts loosely
3) Once both ends of all struts to a vertex are loosely bolted, that vertex can be tightened
4) Once a layer has been completed, lift the dome onto tripods to make room to work on the next layer. Support the dome using 5 tripods placed around at the bottom most dome layer. Put each tripod near a vertex, to avoid bending the struts.
Be careful during construction not to bend struts or put force on joints; parts of the dome will be floppy and vulnerable until all struts are attached. Once all struts are attached you can tighten up the bolts and the dome will be rigid.
As tempting as it is, don't climb on the dome, even after it's complete - EMT pipe is made of relatively thin steel, and the struts will bend under your weight.